Your Adhesive Company
-
Find Product

-
Call Us

-
Email Us


Tips & Tricks
Countertop installers blend the joints of sections of granite by taking the granite "dust" they get from cutting the granite and put it in any gaps at the joint. They then apply our INSTA-CURE™ super thin CA, which saturates the dust and hardens it. Sometimes our INSTA-SET™ accelerator is used to speed this process. Once it is hard, this area can be filed and sanded down to the level of the countertop, then polished to blend into the granite finish.
A version of this same process can be used for the chips. You can put masking tape along the edge of the granite to form a "dam" in the area of the chip. This area can then be filled with granite dust (obtained by filing a hidden area of the bottom of the granite), then apply the INSTA-CURE™ and use the same process used for joints after removing the masking tape. BSI's black IC-2000™ can be used for chips on black granite.
Readers of model magazines have probably noticed that they are split down the middle on how their editors prefer to abbreviate cyanoacrylate. They use CA or CyA. BSI will always use the proper designation, which is CA. One editor says he uses CyA to avoid confusion with the postal designation for the state of California. Since we are talking chemicals and not states, CyA is the symbol for Cyclosporine A. Case closed.
By Troy Newman
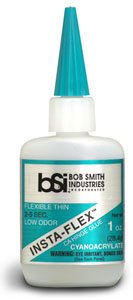 INSTA-FLEX™ - How to install CA Hinges - Cyanoacrylate Adhesive - BSI With CA hinges I'm very picky about CA. Get a fresh bottle of glue. This can make a huge difference. I like the small capillary tips for hinges they make a huge difference in applying the CA in the right spot with just the right sized drops. It’s very important to have fresh glue. As it ages it will start to thicken and will take longer to soak into the hinges. So a fresh bottle of glue is important. I actually buy a fresh small bottle just to hinge with. I tried the new INSTA-FLEX&™ CA and its great for CA hinging. This glue was specially formulated for CA hinges as it is rubber toughened to keep from getting brittle.
A couple of tricks will make the hinge installation process go smoothly. Using a 1/16” drill bit drill a small hole in the hinge slot right in the middle of the hinge location. This hole is parallel to the hinge and only needs to go in as far as the hinge will go. This will allow the glue to flow easier deep into the wood and the hinge surface. I do this for all the hinge slots on the wing, stab and fin, as well as the control surfaces themselves.
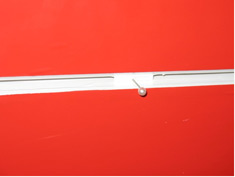
Next trick is to use a small straight pin or “T” pin in the middle of the hinge. 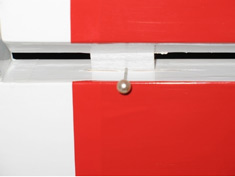 This insures the hinge material is not getting pushed too deep into the surface and not getting good bite on the other side. These pins are only used while aligning everything and inserting the hinges. Remove these pins before gluing as they will not allow you to get the gaps tight. Below is a photo of the pins I used. Once the surface is up tight against the pins then remove them and push the surface tight together.
CA hinges offer the benefit of getting very tight hinge gaps. The larger this gap the more effect the gap will have on way the model performs. Large gaps can cause nightmares with control linkages, surface effectiveness and even flutter that can cause you to crash the model.
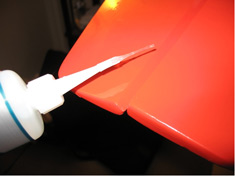
For glue application take one hinge at a time. Put a drop using the fine capillary tip on the glue bottle. Place one drop at a time on one side of the hinge and watch for it to soak into the fiber hinge. Too Much glue will run down the hinge line and make a mess only a small drop right on the fiber of the CA hinge. This drop will soak in, and then add another drop. Continue this process until the drops don’t soak in as fast. Then flip it over and drop by drop the same process on the other side of the same hinge. Never use Accelerator this will make the hinges brittle.
Once the hinge can’t take anymore CA move to the next hinge. Again drop by drop until it will not soak up anymore… Be sure to apply some to both sides of the hinge in the drop by drop manner. The reason to do one hinge at a time is if the CA kicks off before the hinge gets saturated it will not let anymore glue in and will not have enough for the bond. The idea is to keep it wet and absorbing until it can’t absorb anymore. Then it has enough….So watch the drop soak in then apply another immediately until it is saturated. Once you have all the hinges on a surface glued set it aside. Don’t go messing around with the moving the hinge just let it cure.
After about 10-15mins the hinges will be glued in place. The surface will be a stiff…Move it back and forth and the glue will break free right in the middle and the surface will move freely. It may crunch or making a cracking noise at first but this is normal. This is not the hinge breaking it’s the glue on the surface popping loose.
Your surfaces are now hinged
Troy Newman
INSTA-CURE™ works very well with 3/4 oz. to 6 oz. fiberglass cloth for reinforcing joints. Lay the cloth on the surface and apply drops of the thin CA until capillary action saturates the fiberglass.
INSTA-CURE+™ and IC-2000™ are the quickest ways to repair bicycle inner tubes. Locate the puncture by immersing the inflated tube in water, mark it with a pen or pencil, and then deflate and dry off the tube. Pinch the rubber to open up the puncture, then put a very small drop of gap-filling CA on the hole. Release the tube to return it to its normal shape and then spray the drop with INSTA-SET™. Any drop larger than 1/8" doesn’t improve the seal and with use will crack as the rubber flexes. Reinflate the tube and double check for holes you may have missed.
BSI's Los Angeles area dealers have the advantage of counting the wizards from Hollywood's special effects shops as their regular customers. BSI adhesives are used by the technicians that created the miniatures in such favorite movies as Batman, Speed, Jurassic Park and Lord of the Rings, along with the current and upcoming Star Trek, Tron, Lone Ranger and The Hobbit. Next time you see miniatures used in a movie (of course, if they are done right you won't know they aren't full size), chances are they were created with the help of Bob Smith Industries adhesives.
Hobby paints that are alcohol based (acrylic) can be used to add color to epoxies with little effect on the epoxy’s characteristics.
The one question that is answered most often by the technical experts at BSI is what can epoxy be thinned with. Isopropyl alcohol that is 90-99% pure is what works best. It is available from most drug stores at a reasonable price. Rubbing alcohol contains only 70% isopropyl with the other 30% being water, which can become trapped in the cured epoxy. Denatured alcohol (which is ethanol with an additive to make it undrinkable) has also been used to thin epoxy. Acetone will thin epoxy but will sometimes change the curing characteristics. Also, epoxy thinned with acetone can have an adverse effect on white foam. Epoxies can be colored with the various tinting compounds designed for acrylic and latex paints, which are available at many hardware stores. Colored FINISH-CURE™, thinned with isopropyl alcohol, has actually been applied with a spray gun to form a beautiful final finish on several models. Of course, the immediate clean up of the spray equipment is extremely important.
If you are like the average household, it is rare that a week goes by that something doesn't break. Instead of throwing an object away and buying a new one, cyanoacrylates allow you many times to do the environmentally friendly alternative: recycle by repairing it. Ceramic and porcelain objects are probably the most common broken items. If the article is in two or three pieces, MAXI-CURE™ works best. If the object is hollow, the CA should be applied to the inside edge of one piece. When brought together tightly, the excess CA will ooze out on the hollow side and form a bead over the joint. INSTA-SET™ can then be sprayed inside the hollow area to quickly cure the excess CA while it is on the joint, thereby reinforcing it. Any excess CA on the outside of the object can be removed with a paper towel soaked in UN-CURE™. This should be done within the first twenty minutes of curing to make it easier.
If a cup, plate or other object has shattered into more than three pieces, gluing it back together one piece at a time just doesn't work. The last sections will rarely fit just right. To overcome this, a cup, for example, can first be put back together without any adhesive. Masking tape can be used along the joints on the inside of the cup to hold it together. As the last pieces are put into place, some of the masking tape can be lifted to make adjustments so that every joint is so tight they are virtually invisible. INSTA-CURE™ super thin, with either an extra-fine extender tip or PTFE tubing on the end of the nozzle, is then applied sparingly along the outside of each joint. The INSTA-CURE™ will penetrate completely through to the inside surface and bond instantly. The outside of the cup can be sprayed with INSTA-SET™ to cure any excess CA so that the cup can handled immediately. UN-CURE™ is then used to remove any excess CA on the outside, the tape is removed from the inside and the excess CA is cleaned off. You should be able to barely tell that it was ever broken. Areas where small chips are missing can be disguised by coloring them with an appropriately colored felt tip pen.
The earthquakes in California provide extra opportunities for repairs. Cracks in the walls of our homes, which in most cases were tears in the texture coat on the sheet rock, were easily fixed by running SUPER-GOLD™ thin along the crack and applying pressure. Its slightly longer curing time allowed long stretches to be repaired at one time without worrying about premature curing. An 1/8" crack in a ceiling was filled with IC-GEL™ three years ago and has not reappeared. BSI adhesives give ordinary consumers the bonding power used by industrial giants at a fraction of the cost. Every Lancair homebuilt and production full-size aircraft has incorporated INSTA-CURE+™ and INSTA-SET™ in their construction.
Cured CA is actually acrylic plastic. Thick CA with an accelerator can be used to quickly build up layers to replace or modify plastic parts. Unfortunately, neither CA or epoxy works well on most polyethylene or polypropylene, i.e., the flexible, waxy plastics.
Saturate the end of rope or string with thin CA to prevent it from becoming frayed.
Before using any adhesive, adequate ventilation of your work area needs to be addressed. A window or door should be open and/or a small fan placed to circulate the air over your workbench. When using CA, especially super-thin INSTA-CURE™, always loosen the top and then retighten it before carefully cutting off the end of the nozzle. This relieves any pressure that may have built-up inside the bottle that could cause the CA to spurt out. This is definitely an issue when CA is used at higher altitudes. Never have the bottle pointing close to your face while opening it.
The fumes produced by CA are an evaporated form of the CA itself. Develop a habit of never having your face above the objects that you are bonding together. Always keep them well in front of you. The fumes that rise during the curing process, while not toxic, can be very irritating to the eyes and nose. Repeated heavy exposure can cause some people to become sensitized to the fumes. For these people, any exposure to CA fumes can result in cold or flu-type symptoms. If you find yourself falling into this category there are two options. First, you can switch to another adhesive such as BSI's odorless SUPER-GOLD™. Second, you can use protective gear such as a respirator. 3-M makes a dual-cartridge paint spray mask (R-6211) with #6001 Organic Vapor Cartridges that works very well in preventing adverse reactions to CA. 3M 5010 pre-filters can be attached for additional protection.
Cyanoacrylates do not have an adverse effect on body tissue. The heat that is generated when CA comes in contact with human skin can result in some burning, however. Do not wipe-off CA that gets on your hands with a dry paper towel! Most paper towels seem to have just the right chemistry to instantly set off CA with a resultant burst of heat. While not dangerous, this can be very uncomfortable. The primary difference in CA's developed for medical use is the very low heat that is produced when they cure.
Surgical gloves for your hands are recommended when using slower curing epoxies. This is a matter of both convenience and safety. It is a rule that you will have some epoxy on your hands when the phone rings or you need to open a door. It is a nice feeling to know you can just peel off a glove and have a clean hand. While protective creams safeguard your skin, they still can result in epoxy coated doorknobs. Hand protection is much less an issue with faster curing epoxies such as BSI's QUIK-CURE™ since they are thicker and are less likely to run and they remain sticky and gooey for a much shorter period of time.
Small bits and shavings of plastics can be mixed with INSTA-CURE+™ to repair nicks and other damage to large plastic parts. Once cured, it can be sanded smooth to create a surface indistinguishable from the main part. This technique is used for the repair of vinyl automotive bumpers and allows the recycling of existing parts.
QUIK-CURE™, like all other fast setting epoxies, is not resistant to long term exposure of raw model aircraft fuel. It can be used to tack glue firewalls into place but should be coated over with SLOW-CURE™ 30 Minute Epoxy for permanent installation.
BSI adhesives are used by numerous companies in the automotive and aerospace industries. Neico Aviation, the makers of the Lancair series of homebuilt all composite kits, has used INSTA-CURE+™ and INSTA-SET™ in all their products since 1990. The Lancair IV-P is the fastest and most advanced general aviation aircraft on the market today. BSI is proud to be a supplier to Neico Aviation and wishes them the best of luck with their new Columbia production aircraft and their latest kit, the Legacy 2000.
R/C car tires that have been bonded to wheels using INSTA-CURE™ can be removed by putting them into boiling water.
The manufacturing process that produces plywood can sometimes leave a tiny layer on the outside surfaces that inhibits bonding. Plywood should therefore be lightly sanded before bonding to produce the best results. Lite-ply is the most difficult plywood to bond. It soaks up thin CA like a sponge. Thicker CA's such as MAXI-CURE™ are what achieve the best results with plywood. Strength tests of such bonds usually result in the plywood delaminating before the glue joint gives way.
Bob Smith Industrie’ CA tops are acknowledged to be the best available. To achieve the best clog-free results, modelers should follow some basic procedures. Initially, the top should be loosened and then re-tightened to relieve any pressure inside the bottle. Then the most important step is to use a sharp hobby knife of razor blade to cleanly cut off the tip of the top. A rough edge here invites clogging. Squeezing the upright bottle after use will blow air through the top and assures a clear nozzle. If the top is allowed to touch the surface on which accelerator has been applied, a hardening of the glue at the tip will usually occur. Flexing the tip and using your fingernail to remove the hardened CA usually gets the CA flowing again. If a top is abused to the point it cannot be unclogged, soaking it overnight in acetone will return it to as good as new condition.
Loosen and retighten the top to the CA bottle before cutting off the tip. This relieves any internal pressure from inside the bottle, which prevents CA from being forced out unintentionally.
IC-2000™, Bob Smith Industries latest addition to its full line of hobby adhesives, is a rubber-toughened cyanoacrylate that forms superior shock resistant bonds on non-porous surfaces. The black colored CA has added flexibility for bonding of metals, fiberglass, rubber, carbon-fiber and other advanced materials. For model use, IC-2000™ is ideal for the bonding of bulkheads, formers and servo rails to the inside of fiberglass hulls and fuselages. Set-up time is 20-40 seconds, which can be accelerated with INSTA-SET™. When cured, IC-2000™ is pliable enough to be carved with a hobby knife and will withstand temperatures ranging from -40 to 250 degrees F. Modelers have found it is the best adhesive for R/C car tires.
For the application of very small amounts of INSTA-SET™ accelerator, use our fine tip CA applicator for dispensing one drop at a time.
QUIK-CURE™ epoxy works for bonding clear plastics. It will not fog the plastic and if the epoxy gets on the wrong spot, it can be carefully removed with a razor blade without leaving a mark.
FINISH-CURE™ provides a perfect balsa surface preparation that is ready for primer and paint. It can be used by itself, which at first glance would appear the simplest procedure; however, when used with lightweight fiberglass cloth, the modeler actually saves time and weight. The cloth assures that a uniform, minimum amount of FINISH-CURE™ is applied that requires the least amount of sanding. When FINISH-CURE™ is applied by itself and then sanded smooth, you won’t know what the minimum thickness is until you sand through to the wood in spots, which then requires a second coat.
After FINISH-CURE™ is brushed onto the cloth, warm it with a heat gun, then squeegee off all the excess epoxy until there are no glossy areas on the surface. Use acetone to clean your brush and, to make the finishing process a more pleasant experience, always wear disposable surgical gloves for almost instant clean-up.
Are you looking for the best process for sheeting foam core wings? FINISH-CURE™ 20 Minute Epoxy provides a strong and lightweight interface between balsa and foam. After the foam cores are properly prepared by sanding and cleaning them, a thin coat of FINISH-CURE™ is brushed on the bottom balsa wing sheeting. A heat gun is then used to heat the epoxy so that any excess can be squeegeed off. The surface should have a semi-gloss appearance with a little of the wood grain showing through. With the foam core resting in the block it was cut from, the balsa sheeting is then lined up with the trailing edge and pressed down with your hand moving back and forth spanwise, working toward the leading edge. Turn this assembly over into the opposite foam block and repeat the procedure for the top sheeting. Don’t worry about the lack of adhesion toward the leading edge. Now place the entire assembly onto a hard, flat surface (during winter, this may have to be the bathroom floor) and place a large sheet of a hard, flat material on top (the leaf from a table works great). This will evenly distribute the weight of all the heavy items you will now stack on top to compress the sheeting against the foam. After 6 to 8 hrs. in a 72 degree F+ environment the FINISH-CURE™ will give you a fully sheeted wing that has the maximum balsa to foam adhesion and rigidity that can’t be matched by using contact-type cements.
Some foam cores come with the two panels cut from the same block. If this is the case, follow the above procedure, doing both panels at once. When spread into a thin layer, FINISH-CURE™ gives you a little over one hour to work with it. To avoid confusion, mark the inside surface of the balsa sheets with a felt pen to designate their position (top left, etc,). Also, before starting, stack the foam cores in their blocks and tape them together in perfect alignment. With a straightedge and felt pen, draw several vertical lines on each side of the block. These lines will simplify the alignment of the cores in the foam blocks when the weights are stacked on top.
The excess balsa is now trimmed flush with the foam cores. Use a large sanding block to insure that the leading and trailing edges are straight. SUPER-GOLD+™ is then used to glue on the balsa L.E., T.E., and wing tips. For all sanding of the wing, use a sanding block with a hard, flat backing. This results in the glue joints being sanded down at the same rate as the balsa.